By Shakhawat Ullah
15 Min Read
Product Photography for eCommerce: The Complete Beginner’s Guide
Your product photo is your storefront. In an online store, customers cannot touch, smell, or try on your product – so your images have to do all of that heavy lifting. 93% of consumers say visual appearance is the #1 factor in their purchasing decision.
And poor photography is expensive: 22% of all eCommerce returns happen because the product looked different in person than it did in photos.
Whether you are selling apparel, cosmetics, or accessories, this guide walks you through every step of building a product photography workflow – from choosing gear and setting up a home studio, to mastering lighting, editing, and using 2026’s best AI tools to scale without a photoshoot.
Essential Gear & Your Product Photography Setup
You do not need a commercial studio or a five-figure equipment budget. A functional product photography setup for eCommerce requires a minimum 10×12 foot space and a few key pieces of gear.
Best Camera for Product Photography: Smartphone vs. Dedicated Camera
Start with what you have. Modern smartphones are genuinely capable – the iPhone 17 Pro Max achieves up to 94% color accuracy in lab tests. For small accessories, basic apparel, or tight budgets, a flagship smartphone is a solid starting point.
When you are ready to upgrade, these mirrorless cameras are the top picks for 2026:
| Camera | Best For | Reason |
|---|---|---|
| Nikon Z50II | Budget-conscious sellers | APS-C, excellent color science, fast autofocus |
| Fujifilm X-T5 | Detail-heavy products | 40.2 MP sensor, outstanding dynamic range |
| Sony a7 V | High-volume professional shoots | Full-frame, 33MP, weather-sealed |
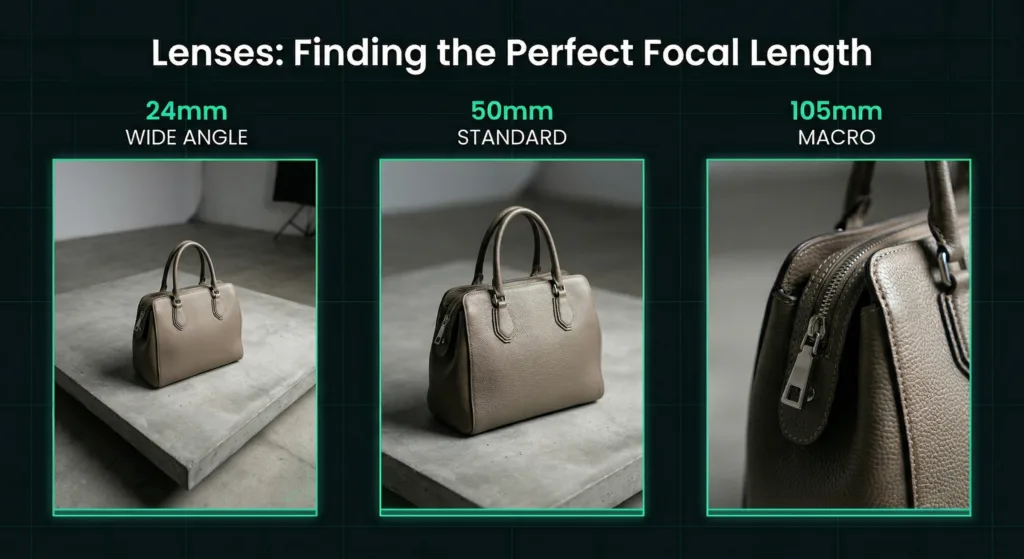
Lenses to pair with your camera:
- 50mm prime (f/1.8): The workhorse for medium-sized products. Natural perspective, budget-friendly.
- 85mm prime: Ideal for shoes, bags, and larger items. Compresses background beautifully.
- 90–105mm macro: Mandatory for jewelry and cosmetics. Captures microscopic texture detail at 1:1 magnification.
Tripods: The Non-Negotiable Piece of Your Setup
Every eCommerce photography guide agrees on one thing: a sturdy tripod is not optional. Handheld shots create subtle framing variations that destroy catalog consistency. Lock your camera down and every product will be framed identically.
For flat lay photography (popular for apparel and accessories), add a horizontal boom arm or C-stand so you can position the camera directly above the product, parallel to the floor.
Budgeting Your Home Studio
| Budget | What You Get |
|---|---|
| $300 Starter | 1 LED panel, shoot-through umbrella, background stand + muslin |
| $1,000 Intermediate | 2-light continuous kit (Godox SL60W), softbox + octabox, seamless paper backdrop |
| $2,000 Advanced | 3-light strobe kit (Godox SK400II), V-flats, multi-roll seamless paper system |
Mastering Product Photography Lighting
Lighting determines 80% of image quality. It is the single biggest variable separating amateur catalog shots from images that convert.
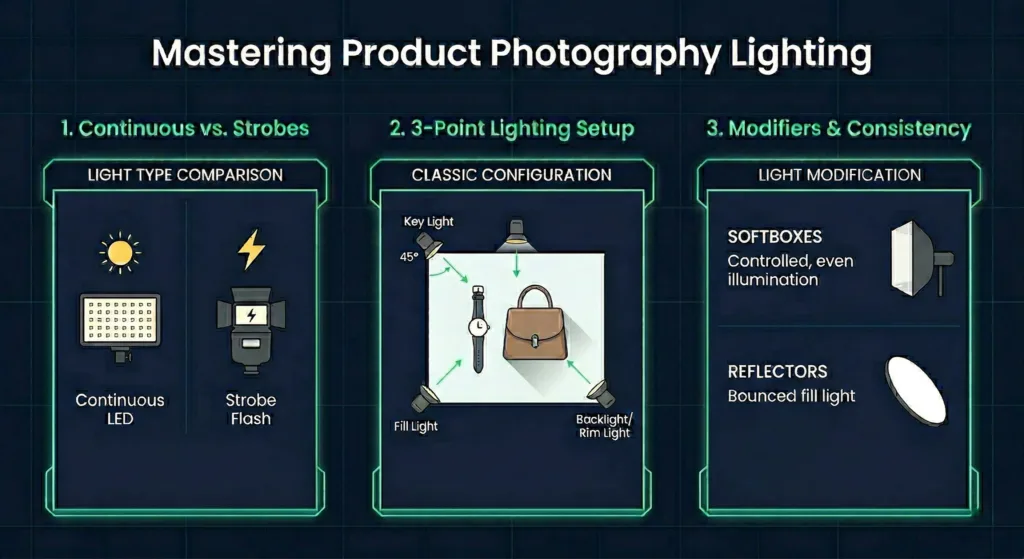
Continuous Lighting vs. Strobes
Continuous LED lights stay on the entire shoot. You see exactly how shadows fall in real time – a major advantage for beginners. They double as video lights, run cool, and are easy to adjust.
Strobes (flashes) fire only at the moment of capture. They are significantly more powerful, allowing you to shoot at f/8–f/11 for maximum depth of field while maintaining a low ISO. They are the professional standard for jewelry, metals, and glass where crispness is critical.
Which should you choose?
- Beginner or hybrid photo/video shooter → Continuous LEDs
- High-volume, high-detail product work → Strobes
The 3-Point Lighting Setup
This classic setup creates professional dimension:
- Key Light: Your primary source, positioned 45° to the product. Sets the overall exposure.
- Fill Light: Softer, placed opposite the key light. Reduces harsh shadows.
- Backlight (Rim Light): Behind the product. Separates it from the background and adds depth.
Light Modifiers: Essential eCommerce Photography Tips
Never shoot with a bare bulb. Modifiers shape the light and eliminate hotspots:
- Softboxes: Mimic window light. Directional and controlled – the standard for clean product shots.
- Umbrellas: Wide, soft, and affordable. Less spill control than softboxes, but great for beginners.
- Reflectors: Bounce light back onto the product to fill shadows – a near-zero cost alternative to a second light.
The Natural Light Trap
Window light looks beautiful but introduces “visual drift”, the phenomenon where your morning batch shot in direct sun looks completely different from your afternoon batch shot under clouds. The color temperature and intensity change constantly.
For a professional eCommerce catalog, artificial lighting is mandatory. Consistency is not a nice-to-have; it is a sales driver.
Camera Settings for Crisp, Clear Product Shots
Auto mode will ruin your catalog. Your camera constantly readjusts brightness, focus, and color, making every frame look slightly different. Here are the settings that give you consistent, sharp images:
| Setting | Recommended Value | Why |
|---|---|---|
| Aperture | f/8 – f/11 | Deep depth of field keeps entire product sharp |
| ISO | 100 – 200 | Eliminates digital noise and grain |
| Shutter Speed | Match to meter zero | Adjust until your light meter reads neutral |
| White Balance | Custom (gray card) | Eliminates color casts from artificial lights |
| File Format | RAW | Preserves maximum data for editing |
For smartphone users:
- Turn on gridlines to keep products perfectly level.
- Tap and hold on the product to activate AE/AF Lock – prevents the camera from refocusing or adjusting brightness between frames.
- Never use digital zoom. Move physically closer or crop in post.
- Enable RAW capture (Apple ProRAW or equivalent) where available.
Styling, Composition, and Angles
Great product photography is not documentation – it is storytelling. The goal is to make the customer feel something before they read a single word.
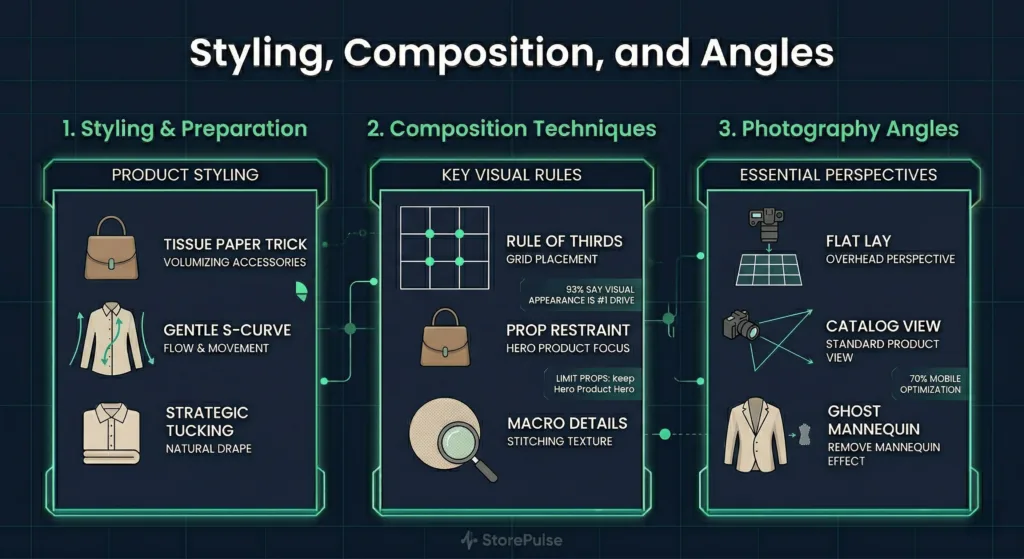
Flat Lay Photography
Flat lays are the gold standard for apparel and accessories. Camera overhead, product on a clean surface. Key techniques:
- Steam everything. High-resolution cameras capture every crease and piece of lint.
- Tissue paper trick: Stuff acid-free tissue under garment shoulders and hips to create natural volume.
- The gentle S-curve: Never lay sleeves or straps perfectly straight – introduce a soft curve to suggest movement.
- Strategic tucking: Fold one side slightly at the waist to show how the garment drapes on a body.
Ghost Mannequin Photography
The industry standard for showing fit without a live model. Shoot the garment on a mannequin, then remove the mannequin in post-production.
The result: a lifelike 3D shape that shows proportions accurately while keeping the focus entirely on the product.
Product Photo Backgrounds: What to Use When
Your background choice signals your brand identity.
| Background Type | Best For | Notes |
|---|---|---|
| Pure White (RGB 255,255,255) | Amazon hero images, Shopify main catalog | Required by Amazon; maximizes grid consistency |
| Textured (stone, linen, wood) | Lifestyle secondary images | Contextually relevant textures increase engagement time by 34% |
| Monochromatic color-matched | Brand-forward campaigns | Match product color, keep 20–30% tonal difference so edges stay visible |
Composition Rules That Drive Conversions
- Rule of Thirds: Place the product slightly off-center for a natural, editorial feel.
- Prop restraint: Limit props to 2–3 complementary colors. The product must remain the hero.
- Macro detail shots: Capture stitching, weave texture, and hardware closeups. 2026 consumers expect to inspect before they buy.
eCommerce Platform Image Requirements
Stunning photos mean nothing if they get rejected or suppressed by the platform.
Amazon Image Specifications
- Main image background: Pure white, RGB 255,255,255 – no exceptions.
- Product fill: Must occupy at least 85% of the frame.
- Minimum resolution: 1,000×1,000px; Amazon recommends 2,000px+ on the longest side for hover-zoom.
- File format: JPEG preferred, max 10 MB.
- Apparel: Women’s and men’s clothing must be photographed on human models for the main image.
Shopify & DTC Platform Specifications
- Recommended size: 2,048×2,048px in a 1:1 square format.
- File size target: Compress to 100–300 KB to protect page load speed.
- Color space: Export in sRGB – other color profiles may shift when processed by Shopify.
- Supports lifestyle backgrounds, transparent PNGs, and 3D (GLB/USDZ) formats.
Mobile Optimization
Over 70% of eCommerce traffic comes from mobile devices. Design your images for the small screen first:
- Crop tightly so the product fills the frame – avoid tiny centered products surrounded by negative space.
- Ensure text on packaging and fine details are legible at thumbnail sizes.
- High-resolution files (2,048px) enable pinch-to-zoom on mobile – a direct conversion driver.
Editing and Post-Production Workflow
RAW files straight from your camera look flat. Post-production is where the image transforms into a polished, conversion-ready asset.
The Core Editing Workflow
Step 1: Crop and straighten. Align verticals. Apply consistent crop ratios (1:1 for Shopify, 4:5 for social).
Step 2: Exposure and contrast. Lift shadows slightly to reveal texture. Do not blow out highlights on light-colored products.
Step 3: White balance. Use the eyedropper on a neutral gray area. A blue shirt should look blue, not teal.
Step 4: Spot retouching. Zoom to 100% and remove dust, lint, and fingerprints using the Spot Healing Brush or Clone Stamp tool. Remove imperfections, not reality. Over-retouching destroys consumer trust.
Focus Stacking for Macro Shots
For jewelry, watches, and small cosmetics, a macro lens at 1:1 magnification produces an extremely shallow depth of field – even at f/16.
Focus stacking solves this: capture a series of frames with incremental focus shifts from front to back, then blend them in Photoshop into a single fully-sharp composite.

Image Source: Wikipedia
Batch Editing for Scale
Once you have dialed in the perfect edits on one “anchor” image, save those adjustments as a preset. Apply the preset across your entire batch with one click. Because your lighting and camera settings were locked in during the shoot, results will be consistent across hundreds of SKUs.
Recommended editing software:
- Adobe Lightroom Classic – Best batch processing and catalog management.
- Capture One Pro – Best for tethered shooting and precision color grading.
- Affinity Photo – Powerful subscription-free alternative to Photoshop.
Why Product Photography Matters for eCommerce
Better photography is not a theory. It is a measurable revenue driver. Here are four real case studies from brands that revamped their product visuals and tracked the outcome.
Every case involved the same lever: giving customers more visual confidence before they clicked Buy. Whether that means a cleaner white background, accurate color rendering, or the ability to rotate a product, the financial outcome is the same.
1. Amazon Seller: 150% Conversion Lift From Professional Photography Alone
An Amazon third-party seller working with POW (Product on White) Photography replaced DIY product shots with professional white-background images. No changes were made to pricing, copy, or ad spend.
Results:
- Conversion rate before: 8.79%
- One week after new photos: 22%
- One month later: The conversion rate jumped to 31%. That’s more than 3x the original rate
The entire lift came from photography. This is the clearest possible demonstration that images, not discounts or ad budgets, are often the biggest conversion lever on a product listing.
2. Petmate: 27% Average Conversion Improvement Across Multiple SKUs
Pet products company Petmate worked with Nectar to upgrade their Amazon product imagery – improving lighting to highlight material textures, sharpening colors, and making key product attributes (like glow-in-dark features) more visible in the hero shot.
They ran A/B split tests across multiple SKUs and tracked the results.
Results:
- Average conversion rate improvement: 27%
- Individual SKU range: 15% to 67% improvement per product
The wide range shows that products with the weakest original photography saw the biggest gains — a common pattern when a catalog has been neglected.
2026 AI Tools for Product Photography
This is where 2026 changes everything. Traditional photography costs $200–$5,000 per session. AI-powered product image generation delivers comparable professional output at $0.10–$2.00 per image – an 80–95% reduction in cost.
The Core Problem: Visual Drift
The biggest failure mode of generic AI tools is visual drift – images generated on different days or with different prompts that look like they belong to three different brands. Your catalog becomes a patchwork, undermining consumer trust.
Top 2026 AI tools solve this:
Nightjar: Extracts the “visual DNA” from your reference images (lighting, angles, color grading) and applies it consistently across your entire catalog. January and July batches match perfectly.
Photoroom: Mobile-first, designed for speed. Instantly creates pure white Amazon-compliant backgrounds and sizes images to Shopify specs. Best for quick background removal at scale.
Claid.ai: Enterprise API solution for teams managing 500+ SKUs. Automates background removal, shadow generation, and image centering programmatically.

TryAura: The AI Photography Studio Built for WooCommerce
All of the above tools share one problem: they live outside your store. You generate images in a browser tab, download files, then re-upload them manually to WooCommerce. Credits expire. Costs compound.
If you are on WooCommerce, there is a native option worth knowing about. TryAura is a WordPress plugin that lets you generate product images, lifestyle shots, and virtual try-on experiences directly inside your dashboard – no external tools, no file juggling.
It runs on your own Gemini API key, so there are no expiring credits.
360-Degree and AR: The Next Level
For electronics, footwear, and furniture, 360-degree photography is becoming an expected standard. Capture 24–36 images on a motorized turntable, stitch them together, and let customers spin and inspect your product from every angle.
Tools like Orbitvu (enterprise automated system) and WebRotate 360 (embeddable HTML5 viewer) handle this.
Augmented Reality (AR) goes further. Customers project a 3D model of your product into their own space using their phone camera. Furniture brands using AR see significant drops in return rates.
2026 Aesthetic Trends
- Cinematic grading: Teal-and-orange for high commercial impact; soft muted tones for luxury brands.
- Retro and film: Grain, vintage warmth, and disposable-camera aesthetics resonate powerfully with Millennials and Gen Z.
- Documentary-style UGC: Unfiltered, real-people lifestyle imagery outperforms ghost mannequin shots on social media.
- Sustainability signaling: Stone, wood, and raw linen backdrops communicate eco-conscious brand values. Green studio practices (LED panels, rechargeable systems) are a growing differentiator.
Frequently Asked Questions
What is the best camera for product photography for eCommerce?
For beginners, a modern smartphone (iPhone 16 Pro Max, Samsung Galaxy S24 Ultra) is sufficient. For professional results, the Nikon Z50II, Fujifilm X-T5, or Sony a7 V are the top 2026 options. Pair any camera with a 50mm or 85mm prime lens for standard products.
What background should I use for eCommerce product photos?
Use a pure white background (RGB 255,255,255) for your main hero image. Amazon requires it and it creates a clean catalog. For secondary lifestyle images, textured surfaces like linen, wood, or stone increase engagement. Monochromatic color-matched backgrounds boost brand recall by up to 80%.
How do I make product photos look professional on a budget?
A $300 setup (one LED panel, shoot-through umbrella, background stand) produces professional results when combined with a tripod, manual camera settings (f/8–f/11, ISO 100–200), and consistent editing presets in Lightroom.
What are the image requirements for Amazon and Shopify?
Amazon: Pure white background, product fills 85%+ of frame, minimum 1,000×1,000px (2,000px+ recommended), JPEG format, max 10MB. Shopify: 2,048×2,048px square, exported in sRGB, compressed to 100–300 KB.
Can I skip a physical photoshoot entirely?
Yes. AI tools like TryAura let WooCommerce store owners generate studio-quality product images, lifestyle shots, and videos from basic reference photos without any physical setup. The virtual try-on feature further reduces return rates by letting customers see products on themselves before purchasing.
How do I ensure color accuracy in product photos?
Set a custom white balance using a gray card during the shoot. Export images in the sRGB color space. Always check your final image against the physical product under natural light before publishing.
Conclusion: Start Small, Scale Smart
Most ecommerce stores treat product photography as a one-time setup task. The ones that consistently outperform their category treat it as an ongoing system.
The difference is not budget. It is repeatability.
Once your lighting is locked, your camera settings are fixed, and your editing preset is saved, adding a new SKU to your catalog should take minutes, not days. That is the standard worth building toward.
If you are just starting out, do not wait for the perfect setup.
One light, one background, one consistent angle beats zero. Ship something, measure your conversion rate, and iterate from there.
If you are already getting traffic but not converting, your images are the first place to look – before you touch your copy, your pricing, or your ads.
And if you are managing a growing WooCommerce catalog and a photoshoot for every product update is not realistic, that is what TryAura is built for studio-quality images, lifestyle shots, product videos, and virtual try-on – generated inside your WordPress dashboard from a single reference photo.
Category:
Tags: